
How to Password Protect a Folder on Mac: 4 Encryption Options Compared
Comparison of four Different encryption options available for MacOs
To password protect a folder on a Mac, you need real encryption, not a zip trick or a locked checkbox. Four tools can do it, and they differ most in when they protect you.
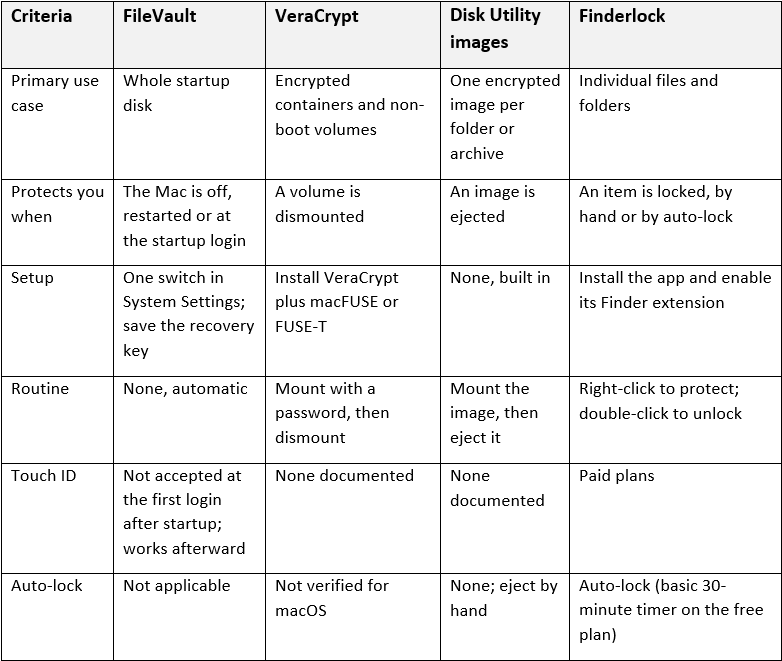
FileVault encrypts your whole startup disk and guards it while the Mac is off or waiting at the startup login. VeraCrypt and Disk Utility encrypt containers that you mount and eject by hand. Finderlock puts the same macOS disk-image encryption behind a right-click, Touch ID and auto-lock, so the folders you choose stay locked while your Mac is on.
In short: FileVault protects a Mac nobody is using. The other three protect specific files on a Mac somebody is using. Most people need FileVault first, and a second layer only if their situation calls for it.
How we built this: we make Finderlock. This comparison draws on Apple’s, VeraCrypt’s and Finderlock’s own documentation (linked throughout), not a timed hands-on test of all four tools, and we mark anything we couldn’t verify.
Quick verdict: which Mac encryption fits you? Start with FileVault, then add a file-level tool only if you need one. There is no single winner, because these tools solve different problems.
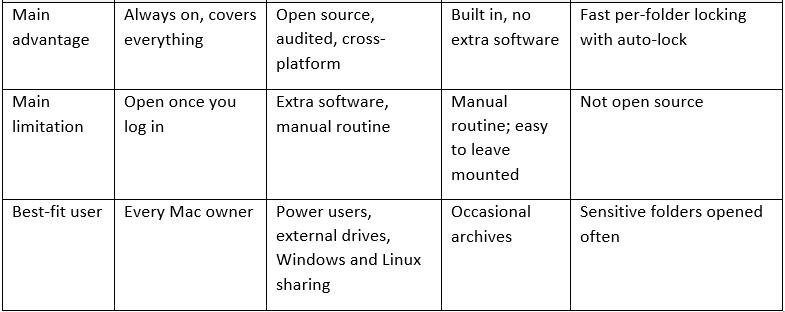
- FileVault: best for every Mac owner, especially laptops. It protects everything if the Mac is lost or stolen.
- VeraCrypt: best if you need open source, hidden volumes, or containers that also open on Windows and Linux. It is also a solid choice as USB encryption software for external drives.
- Disk Utility encrypted images: best for an occasional encrypted archive that you store or send.
- Finderlock: best for sensitive folders you open often, on a Mac other people can reach.
The most important difference: FileVault is always on, but it protects data only at rest. The other three protect specific items, and only while those items are locked, so how easy they are to lock decides whether you actually keep them locked.
If your only worry is a lost or stolen laptop that nobody else uses, FileVault alone is enough.
What each tool does well, and where we fall short
FileVault on Mac
Apple says a Mac with Apple silicon or a T2 chip encrypts your data automatically, and that turning on FileVault ties access to your login password. It’s free, built in, invisible day to day, and the right answer for a lost or stolen laptop.
Its limits are specific. If you forget your login password and lose your recovery key, Apple warns your files are gone for good. Touch ID isn’t accepted for the first login after a startup, restart or logout. And once you’re logged in, the disk is unlocked: your files are readable to you, to apps running as you, and to anyone at your open laptop. FileVault has no per-folder locks and isn’t designed to.
VeraCrypt
VeraCrypt is stronger than Finderlock in several ways:
- Open source. Anyone can read the code.
- Independently audited. Quarkslab reviewed version 1.18 in 2016 for the Open Source Technology Improvement Fund, found issues, and the fixes shipped in 1.19. Fraunhofer SIT published a second audit in 2020. Audits are snapshots of a past version, but a public audit trail still counts.
- More cipher choice. AES, Serpent, Twofish, Camellia, Kuznyechik, and cascades of them.
- Hidden volumes for plausible deniability, which the other three don’t offer.
- Cross-platform. One container opens on Windows, macOS and Linux. On a Mac it’s harder to live with. It needs macFUSE or FUSE-T: VeraCrypt’s download page offers both builds and recommends FUSE-T for Apple silicon, and macFUSE’s own guide walks through approving a kernel extension and adjusting startup security policy. You mount and dismount volumes by hand, and you encrypt whole containers, not single files. VeraCrypt’s documentation describes pre-boot system encryption for Windows, so on a Mac it’s for containers and secondary volumes, never your startup disk. We found no documented Touch ID support.
Disk Utility encrypted images
Disk Utility is already on your Mac. It creates a password-protected image that mounts like a drive, with 128-bit or 256-bit AES, and you can move the file to another Mac. Apple documents every step, and Apple itself points you to FileVault for the system disk. The cost is effort and discipline: a mounted image is open to anyone using your Mac, and the password dialog can offer to remember the password in your keychain, which university IT guides advise against on shared Macs.
Where Finderlock falls short
- Unlocked means readable. While an item is unlocked, it’s plain data on your Mac. Finderlock narrows that window; it doesn’t close it.
- Not open source. You can read how it works on our security page, but you can’t audit the code the way you can VeraCrypt’s.
- Zero-knowledge. If you lose your password and have no backup, nobody, including us, can recover your files.
- You need the app to open locked items, and macOS 13 or later.
Side-by-side comparison
Many Mac guides stop at three shortcuts, and none of them encrypts a folder properly:
- Compress in Finder makes a zip file but has no password option.
- Terminal’s zip -e adds a password, but it uses the legacy ZipCrypto scheme, which security guides widely describe as weak. For a Mac zip with a password that holds up, you need an app that supports AES-256, such as Keka.
- Get Info → Locked only marks an item as protected against edits. It doesn’t encrypt anything.
For a folder that is actually encrypted, use one of the four tools in this guide.
The differences that matter most
1. When the protection applies
The difference. FileVault guards a Mac nobody is using. The other three guard files on a Mac somebody is using. How they work. FileVault encrypts the startup volume and unlocks it at login, so everything is readable for the whole session. A VeraCrypt volume or Disk Utility image is readable from the moment you mount it until you dismount or eject it, and Apple warns that a mounted image is open to anyone with access to your computer. Finderlock re-locks items automatically with its auto-lock feature.
Why it matters. The risks are different. A stolen, powered-off laptop is a FileVault problem. A coworker at your open Mac, a family member on your account, or a borrowed laptop is not.
Which fits. Worried about loss or theft: FileVault. Worried about people who can reach your unlocked Mac: a container tool, plus the habit of locking it, or Finderlock’s auto-lock if you tend to forget.
2. FileVault vs VeraCrypt on a Mac: not really rivals
The difference. Scope: whole disk, container, or single item. How they work. FileVault covers the startup disk. VeraCrypt’s documentation describes system encryption for Windows, so on a Mac it handles containers and non-system volumes only. A Disk Utility image holds one folder’s worth of files, and Finderlock locks items individually.
Why it matters. People searching for FileVault vs VeraCrypt often treat them as alternatives. On a Mac they do different jobs: FileVault for the disk, VeraCrypt for portable containers and drives. VeraCrypt is also the only one of the four built to open on Windows and Linux.
Which fits. Need the whole Mac covered: FileVault, always. Need one encrypted container to travel between operating systems: VeraCrypt.
3. How much work each protection costs per use
The difference. The effort you repeat every time you open the files.
How they work. FileVault asks nothing after setup. VeraCrypt on a Mac means installing VeraCrypt plus macFUSE or FUSE-T, creating a container, mounting it with your password and dismounting it. Apple’s steps for a secure Disk Utility image are longer: choose size, format and encryption, set a password, copy files in, trash the originals and empty the Trash, then eject. Finderlock reduces it to right-click → Protect with Finderlock, then double-click to unlock and open, with auto-lock handling the re-lock.
Why it matters. Protection you skip protects nothing. If you want to password protect a folder on a Mac without Disk Utility’s routine, your realistic choices are VeraCrypt, which takes the most setup, or an app that automates the steps.
Which fits. A folder you encrypt once a month: Disk Utility costs nothing and is fine. Files you open daily: automate it.
4. What you can inspect, and what you can recover
The difference. Who you have to trust, and what happens if you forget the password.
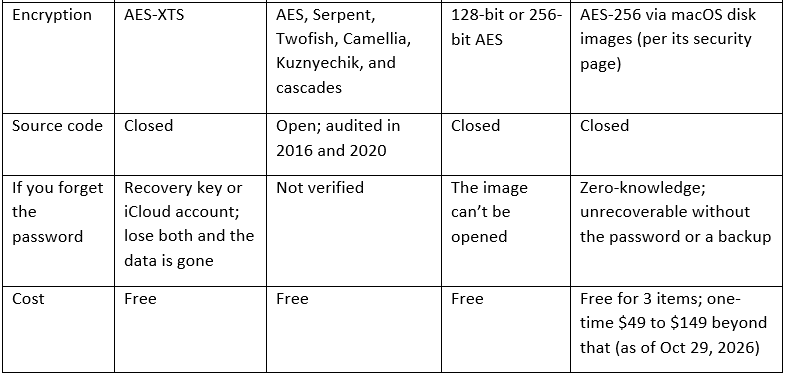
How they work. VeraCrypt publishes its code and has public audits. FileVault is Apple’s closed implementation, documented in Apple’s Platform Security guide. Finderlock says it writes no cryptography of its own and relies on macOS’s encrypted disk images, but the app itself is closed, so you’re trusting its key handling. On recovery, FileVault offers a recovery key or iCloud account. Apple warns a forgotten Disk Utility image password means you can’t open the image. Finderlock is zero-knowledge, with an optional master password and optional backup of the encrypted containers to iCloud Drive or Google Drive.
Why it matters. Anyone who must verify the code, such as a journalist or a compliance team, has one clear answer: VeraCrypt. Everyone should plan recovery before encrypting anything they can’t replace.
Which fits. Need auditable source: VeraCrypt. Comfortable relying on Apple’s encryption and want an easier workflow: Disk Utility or Finderlock, with the recovery steps set up first.
Which should you choose?
FileVault alone is a better fit if you use a laptop, your main worry is losing it or having it stolen, you’re the only person on the Mac, your login password is strong, and your screen locks quickly. That describes a lot of people. If it’s you, turn on FileVault, save your recovery key, and you’re done.
VeraCrypt is a better fit if you need open source or an audit trail, want containers that open on Windows and Linux, or encrypt USB drives and external disks, and you’re comfortable installing macFUSE or FUSE-T.
Disk Utility images are a better fit if you occasionally need to lock a folder to archive or send it, want no extra software, and don’t mind the manual steps.
Finderlock is a better fit if other people can reach your Mac, you work in public places, or you open sensitive folders often (tax records, client documents, IDs, SSH keys) and want them locked the rest of the time, ideally with Touch ID.
A third option. If none of these fit, look at other VeraCrypt alternatives. Cryptomator, Keka and Encrypto come up often in Mac encryption searches, but we haven’t compared them here.
Our recommendation. For most Mac users who handle sensitive folders, the best setup is FileVault plus Finderlock. They protect against different things, so they don’t overlap.
Quick answers
How do I password protect a folder on a Mac?
Create an encrypted disk image in Disk Utility (File > New Image > Image from Folder, then pick an encryption option and set a password), or use an app like Finderlock that does it from a right-click. Delete the unencrypted original afterward.
Can you password protect a zip file on a Mac?
Not from Finder alone. Terminal’s zip -e works but uses weak legacy ZipCrypto, and apps such as Keka can create AES-256 archives. To encrypt a zip file on a Mac for files you open often, an encrypted disk image is usually a better fit.
Is VeraCrypt secure?
It’s open source and has been independently audited (Quarkslab in 2016, Fraunhofer SIT in 2020), and the issues found in 2016 were fixed in version 1.19. No audit guarantees the current version is flawless, and like any encryption it protects your data only while a volume is dismounted.
Is FileVault enough?
For a lost or stolen laptop, usually yes. It adds no extra protection once you’re logged in.
Can I use these tools together?
Yes. FileVault protects the disk while the Mac is off, and a container or file-level tool locks chosen files while it’s on. Finderlock is designed to run alongside FileVault.
What should I do before protecting important files with Finderlock?
Set a master password, turn on backup, test unlocking a non-critical folder, and unlock your items before uninstalling the app.
Your next step
Don’t migrate anything important on day one. Try the tool on one non-critical folder, lock it, unlock it, and see whether the routine fits how you work. Finderlock’s free plan covers 3 protected items with no time limit, and paid plans carry a 14-day money-back guarantee. For details on keys, Keychain and where your data lives, read the security page.
Related reading: How to Password Protect a Folder on Mac and How to Auto-Lock Files on Mac with Smart Rules